Wednesday, November 20, 2013

A Sweater Kit

I have been really busy these last three months with sewing and knitting projects to the point that I have not even posted anything.  For most of the time I was working to finish and write up the instructions for a sweater that I designed for a friend's wool.  Rachel Willis, otherwise known as Mountain Girl Cakes, makes her money by making cakes for weddings and other events.  In her free time, when she is not baking cakes and looking after her son, she is looking after over 100 Navajo Churro sheep.  She called me yesterday to get my daughter's cake order for her birthday and said she was in the middle of shearing.

Rachel shears the sheep with help from her husband, or maybe vice versa, then ships the wool off to be processed and spun in New Mexico.  Once she has the yarn back, she dyes it using natural dyes such as walnut, comfrey, marigold, goldenrod, cochineal, indigo, and madder.  The colors she produces are wondrous.

PHOTO
This photo comes from the blog www.beyondtheflavor.com, see their article about Rachel.

I had Rachel pick her favorite range of colors and using those I designed a sweater.  She chose the walnut yarns and we used dark burgundy dyed using cochineal as an accent.  I started the sweater at the beginning of August while in Cape Cod, and then continued the designing and knitting until we got the kits together for the Fall Fiber Festival at Montpellier in October.  That show was held in the hottest day of fall, and not a single person tried on the sweater although we did sell a few kits.

Here is the beginning of the sweater that I posted earlier.


Here are some shots of the final sweater.


It doesn't look like much hanging there, but it looks great on.  It is fitted through the bust and waist and flares out at the hip.  It falls just below the hip and has slit opening at the sleeve bottom.  The buttons are sewn on, but the sweater uses covered snaps and the button band is lined with cotton fabric to keep the band from stretching.  The collar is lined inside with a velvet ribbon for comfort.

We have several more kits made up and are now looking for a local outlet from with to sell them.

Right now, I am finishing up the body of my sweater, and hope to start knitting the sleeves tomorrow.  Mine goes from a dark brownish black at the bottom, to an olive green, a medium green, and a light green at the top with indigo blue accents.  Hope to have it finished and posted soon.


Birthday Monsters

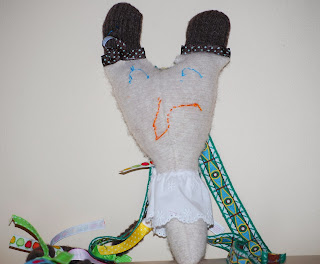
For my daughter's 10th birthday we decided to have the girls make monsters.  The night before the birthday, my daughter and I cut up felted sweaters and sewed and stuffed them into silly shapes.   The next day, we had the girls sew on button eyes, decorate with ribbons and embroidery thread.  They had to decide what their little monsters were going to look like.  There was a bit of grumbling at first from a couple of the girls, but then they got into the spirit of things and got busy.


First, they had to learn to thread a needle and sew on a button.


Busy hands and lots of help for each other.


The Results


A Catfish wearing a skirt.


A one-eyed jellyfish with a flower hat.


 A fish with wings and a fancy tail.


A hippy owl


I am not sure what kind of monster this one is, but is sporting a button bracelet and lots of ribbons in her  mane.


 A one-legged monster with a crazy mouth, skirt and ribbon hair.


A little mousie with a flower skirt and ribbons on her ears.

Felted Sweater Pillow Tutorial

I didn't start out intending to make pillows; I started with a lap quilt.  I made the lap quilt, and I was going to post the tutorial for it, but...


We used it for a couple months last winter and my son proceeded to get food on it, despite the fact that he is not allowed to eat in the living room.  I washed and dried it, and although I had felted the sweaters by washing them in hot water, then drying them on hot and doing the same with the backing, the sweaters shrunk and left the backing in a mess. Here is the backing pre washing, and hand blanket stitched all around.


 Live and learn, so I did.  Now I decided what our naked sofa needed was pillows, and after sewing the clothes for Project Reveal, I needed an easy project, so pillows it was.

 Here it goes:  Tutorial for Felted Sweater Pillows.

I found these cashmere sweaters at Goodwill.  I can't remember how much I paid for them, but they were men's sweaters with a bit of wear and some holes.  However, the color suited me well.

1.  Wash the sweaters in hot water and dry them to felt.

2.  Cut them up into squares and rectangles, using a cutting mat and roller knife makes this easier.  I cut them into the biggest pieces I could.

3.  Measure to find out how big the pillows needed to be.  I had two 18X18" pillow forms, so to make the pillows look full and stuffed,  make the pillows and backing the same size as your insert.

4.  After cutting out the squares, lay them out and arrange them to your liking.


5.  Next, stitch the pieces together, joining the squares using a 1/4" seam.


7.  Once you have all the sweater pieces joined into the size you want, (18" x 18" as shown below) steam and block it to get the pieces as square as you can.


7.  Neaten the edges by using a roller knife and straight edge.


8.  Cut a backing the same size as the pillow.  In my case, I used an 18 x 18" piece of cotton that I recycled from an old chair cover.  


9.  Lay the sweaters on top of the backing and quilt the sweaters to the backing layer.  This way, when you wash the pillow, hopefully it will not shrink causing problems.  I quilted around all of the blocks, and then I steamed the pillow top again to make sure everything was smooth and tight.


10.  Cut the pillow back out of a preshrunk fabric.  Cut two pieces out.  For the 18x18" pillow, I cut two pieces out 18"x12" to make an envelope back.  I wanted at least a finished 4 inch overlap so I cut them with a 6 inch overlap to begin with.


11.  Stitch down the edge toward the middle of the pillow pieces 1/4" from the edge.


12.  Press this seam over at the stitching, and then fold over again to hide the raw edge and press.  I folded the edge over about 1 - 1/2 inches.  Do this for both back pieces.


 13.  Stitch the folder in place about 1/4" from the edge.


 14.  Place one back on top of the quilted pillow top right sides together and pin in place and stitch around using a 1/2" seam allowance.


 15.  Place the other back over the first with the folded seams to the middle and right sides facing and stitch into place with 1/2" seam allowance.


16.  Cut the corners on the diagonal so that you can push out the corner when turned right side out.  Be sure you don't cut into the seam.


17.  Turn right side out and push out the corners and put in the pillow form.  Here is a photo of the back of the finished pillow.


Here is the finished pillow in place.  I made two like this one, but then decided they looked a little lonely, so I made two smaller ones (12x18") using the backing fabric, which is a cream denim that I had leftover from an earlier project.


 Enjoy!


Monday, November 11, 2013

Project Reveal

This past weekend I competed again in my local fabric store's Project Runway type competition, something they call Project Reveal.  This is the fourth year that Les Fabriques has been running this competition.  This year the theme was Paris and there were 13 outfits that were shown.  There was a three judge panel, one of whom was a professor from Virginia Commonwealth University.  The judges seemed to like a clean, well fitted design this year.  First place was a beautiful black and white, low-backed dress with a chevron bodice and horizontal stripes on the skirt.  Unfortunately, I did not get a photograph of this one.  Second prize was a beautiful evening suit designed and sewn by Tatiana and modeled by her friend Anna.  This suit is sewn in a wool silk blend of a greenish grey color.  The nest is made by Katarzyna Borek.  She makes amazing birds nests from wool and real eggs that are attached to a headband.


Third place was a beautiful Chanel suit made my Doris; she made her Chanel bag also.


So, I have had a busy few months, as you can tell by my lack of postings.  However, that is no real excuse, but I will have to work harder on getting my fit better if I decide to enter again.

In any case, here are some photos from the show.  This is my raincoat that I have posted about previously.  I finally finished all the handwork.  I embroidered the pockets, collars and cuffs with ribbon for Mokuba.  


My inspiration was Paul Poiret's Sorbet dress from 1913.

  I made it more contemporary using a peplum.  At the time I started this top, I didn't realize that peplums were the big controversy of fashion right now.  


I am also wearing a nest made by Kasia.  She made it especially to complement my coat.  I think she did a fabulous job.  The above photograph is full size so you can see the stitching.  The interior of the top is linen to give the silk a sturdy frame to be sewn to.  The outside is silk, and I think quilted around the flowers on the black, and quilted the outline of the flowers in black silk thread on the white silk.


I guess now that I have finished it, my main concern since I made it with the peplum is that it will look dated after this year.